N04C-VQ ENGINE MECHANICAL ENGINE ASSEMBLY INSTALLATION
PROCEDURE

 23849G
1.INSTALL FUEL PIPE SUPPORT
Install the fuel pipe support with the 2 bolts.
- Torque:
55 N*m (560 kgf*cm, 41 ft.*lbf)
23809L
2.INSTALL FUEL PIPE SUPPORT SUB-ASSEMBLY
Install the fuel pipe support sub-assembly with the 2 bolts.
- Torque:
55 N*m (560 kgf*cm, 41 ft.*lbf)
17111
3.INSTALL INTAKE MANIFOLD
17141
4.INSTALL EXHAUST MANIFOLD
17107
5.INSTALL EXHAUST MANIFOLD HEAT INSULATOR SUB-ASSEMBLY
15701C
6.INSTALL OIL COOLER COVER SUB-ASSEMBLY
23264D
7.INSTALL FUEL FILTER BRACKET
Install the fuel filter bracket with the 2 bolts.
- Torque:
55 N*m (560 kgf*cm, 41 ft.*lbf)
23849G
8.INSTALL FUEL PIPE SUPPORT
Install the fuel pipe support with the bolt.
- Torque:
29 N*m (291 kgf*cm, 21 ft.*lbf)
29300
9.INSTALL VACUUM PUMP ASSEMBLY
Install a new O-ring and the vacuum pump assembly with the 2 nuts.
- Torque:
55 N*m (560 kgf*cm, 41 ft.*lbf)
29601B
10.INSTALL VACUUM PUMP OIL PIPE SUB-ASSEMBLY
Install 3 new gaskets and the vacuum pump oil pipe sub-assembly with the 3 union bolts.
- Torque:
20 N*m (204 kgf*cm, 15 ft.*lbf)
19971E
11.INSTALL VACUUM PIPE
Install 2 new gaskets and the vacuum pipe with the union bolt.
- Torque:
13 N*m (130 kgf*cm, 10 ft.*lbf)
Install the pipe clamp with the nut. Tighten the nut until the clamp edges make contact.
23310
12.INSTALL UPPER FUEL FILTER BODY
Install the upper fuel filter body with the 2 bolts.
- Torque:
55 N*m (560 kgf*cm, 41 ft.*lbf)
23300D
13.INSTALL DIESEL FUEL FILTER ASSEMBLY
23803H
14.INSTALL FUEL RETURN PIPE SUB-ASSEMBLY
Install a new gasket and the fuel return pipe sub-assembly with union bolt.
- Torque:
20 N*m (200 kgf*cm, 15 ft.*lbf)
23802E
15.INSTALL NO. 4 FUEL PIPE SUB-ASSEMBLY
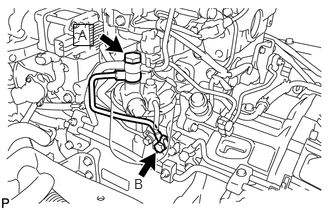
Install 2 new gaskets and the No. 4 fuel pipe sub-assembly with the 2 union bolts.
- Torque:
- for bolt A:
25 N*m (255 kgf*cm, 18 ft.*lbf)
- for bolt B:
20 N*m (200 kgf*cm, 15 ft.*lbf)
16.INSTALL NO. 3 NOZZLE LEAKAGE PIPE SUB-ASSEMBLY
23803H
17.INSTALL FUEL RETURN PIPE SUB-ASSEMBLY
22100
18.INSTALL FUEL SUPPLY PUMP ASSEMBLY
23810A
19.INSTALL COMMON RAIL ASSEMBLY
23811
20.INSTALL FUEL FILTER TO INJECTION PUMP FUEL PIPE
11177
21.INSTALL INJECTION NOZZLE SEAT GASKET
23670
22.INSTALL INJECTOR ASSEMBLY
23741B
23.INSTALL INJECTION PIPE CLAMP
16100
24.INSTALL ENGINE WATER PUMP ASSEMBLY
16206
25.INSTALL WATER BY-PASS PIPE SUB-ASSEMBLY
Install 6 new O-rings and the water by-pass pipe sub-assembly with the 6 bolts.
- Torque:
29 N*m (291 kgf*cm, 21 ft.*lbf)
26.INSTALL NO. 2 WATER BY-PASS PIPE SUB-ASSEMBLY
Install the No. 2 water by-pass pipe sub-assembly with the 2 bolts.
- Torque:
29 N*m (291 kgf*cm, 21 ft.*lbf)
Connect the water hose and slide the clamp to secure the hose.
87208L
27.INSTALL WATER PIPE SUB-ASSEMBLY
Install a new O-ring and the water pipe sub-assembly with the 3 bolts.
- Torque:
29 N*m (291 kgf*cm, 21 ft.*lbf)
16333
28.INSTALL WATER OUTLET HOUSING
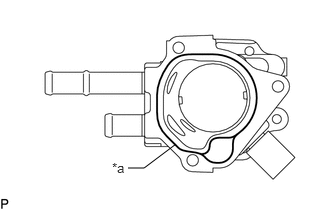
Apply seal packing in a continuous line as shown in the illustration.
- Seal packing:
Toyota Genuine Seal Packing Black, Three Bond 1207B or equivalent
- Standard seal diameter:
2.2 to 2.7 mm (0.0866 to 0.106 in. )
| *a | Seal Packing |
- NOTICE:
- ·
Remove any oil from the contact surface.
·Install the water outlet housing within 3 minutes, and tighten the bolts within 15 minutes of applying the seal packing.
Install the water outlet housing with the 3 bolts.
- Torque:
29 N*m (291 kgf*cm, 21 ft.*lbf)
16331A
29.INSTALL THERMOSTAT
88431A
30.INSTALL NO. 2 COMPRESSOR MOUNTING BRACKET (w/ Air Conditioning System)
Temporarily install to the No. 1 compressor mounting bracket and No. 2 compressor mounting bracket with the 7 bolts.
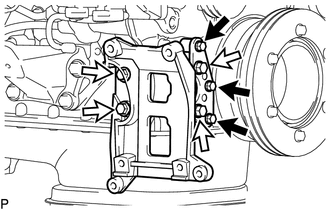
Tighten the 7 bolts.
- Torque:
- for bolt A:
29 N*m (296 kgf*cm, 21 ft.*lbf)
- for bolt B:
55 N*m (561 kgf*cm, 41 ft.*lbf)

|
for bolt A |

|
for bolt B |
- HINT:
-
Firmly press and hold, the No. 1 compressor mounting bracket and No. 2 compressor mounting bracket against the timing gear case to eliminate any gaps. Then uniformly tighten the 7 bolts.
88440B
31.INSTALL IDLE PULLEY ASSEMBLY WITH BRACKET (w/ Air Conditioning System)
Install the idle pulley assembly with bracket with the 3 bolts.
- Torque:
55 N*m (560 kgf*cm, 41 ft.*lbf)
16630G
32.INSTALL IDLER PULLEY ASSEMBLY
Install the idler pulley assembly with the 2 bolts.
- Torque:
55 N*m (560 kgf*cm, 41 ft.*lbf)
11301M
33.INSTALL CAMSHAFT POSITION SENSOR
11301K
34.INSTALL CRANKSHAFT POSITION SENSOR
83420
35.INSTALL WATER TEMPERATURE SENDER GAGE ASSEMBLY
26100
36.INSTALL DIESEL THROTTLE BODY
25620
37.INSTALL EGR VALVE ASSEMBLY
11213
38.INSTALL CYLINDER HEAD COVER GASKET
Install a new cylinder head cover gasket onto the No. 2 cylinder head cover sub-assembly.
11228
39.INSTALL CYLINDER HEAD COVER CUSHION
Install the 2 cylinder head cover spacers and 2 cylinder head cover cushions onto the No. 2 cylinder head cover sub-assembly.
11202D
40.INSTALL NO. 2 CYLINDER HEAD COVER SUB-ASSEMBLY
Install the No. 2 cylinder head cover sub-assembly with the 2 bolts.
- Torque:
29 N*m (291 kgf*cm, 21 ft.*lbf)
Connect the 5 connectors and install the wire harness.
11247
41.INSTALL CYLINDER HEAD COVER STAY
Install the 2 cylinder head cover stays onto the cylinder head cover sub-assembly.
11202F
42.INSTALL CYLINDER HEAD COVER CUSHION RUBBER
Install the cylinder head cover cushion rubber onto the cylinder head cover sub-assembly.
11201
43.INSTALL CYLINDER HEAD COVER SUB-ASSEMBLY
Install the cylinder head cover sub-assembly with the 2 bolts.
- Torque:
29 N*m (291 kgf*cm, 21 ft.*lbf)
12180E
44.INSTALL OIL FILLER CAP ASSEMBLY
Install the oil filler cap sub-assembly.
45.REMOVE ENGINE STAND
Install the No. 1 engine hanger with the 2 bolts.
- Torque:
125 N*m (1275 kgf*cm, 92 ft.*lbf)
Install the generator bracket with the 2 bolts.
- Torque:
125 N*m (1275 kgf*cm, 92 ft.*lbf)
Attach an engine sling device and hang the engine assembly with a chain block.
Lift the engine assembly and remove it from the engine stand.
- CAUTION:
-
With the exception of installing the engine assembly to an engine stand or removing the engine assembly from an engine stand, do not perform any work on the engine while it is suspended, as doing so is dangerous.
- NOTICE:
-
Pay attention to the angle of the sling device as the engine assembly or engine hangers may be damaged or deformed if the angle is incorrect.
11000
46.INSTALL ENGINE ASSEMBLY
Using an engine lifter, support the engine and height adjustments or plate lift attachments.
- NOTICE:
- ·
Place the height adjustments and plate lift attachments so that the engine assembly is level.
·Securely support the engine assembly to prevent it from turning upside down until it is secured to the engine lifter.
Install the engine assembly.
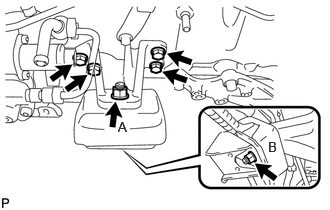
Install the front No. 1 engine mounting bracket LH with the 4 bolts.
- Torque:
69 N*m (699 kgf*cm, 51 ft.*lbf)
Install the engine mounting stabilizer and front engine mounting insulator with the 2 nuts and washer.
- Torque:
- for nut A:
87 N*m (887 kgf*cm, 64 ft.*lbf)
- for nut B:
90 N*m (918 kgf*cm, 66 ft.*lbf)
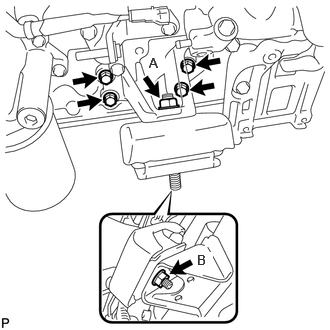
Install the front No. 1 engine mounting bracket RH with the 4 bolts.
- Torque:
69 N*m (699 kgf*cm, 51 ft.*lbf)
Install the engine mounting stabilizer and front engine mounting insulator with the 2 nuts and washer.
- Torque:
- for nut A:
87 N*m (887 kgf*cm, 64 ft.*lbf)
- for nut B:
90 N*m (918 kgf*cm, 66 ft.*lbf)
82121
47.CONNECT ENGINE WIRE
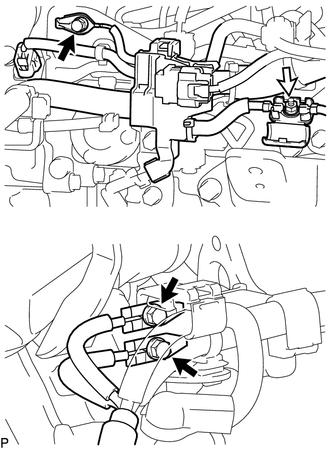
Connect the engine wire to the engine assembly with the 3 bolts and nut.
- Torque:
- for bolt:
8.4 N*m (86 kgf*cm, 74 ft.*lbf)
- for nut:
5.0 N*m (51 kgf*cm, 44 ft.*lbf)
|
|
Bolt |
|
|
Nut |
Connect the engine wire to the No. 1 engine hanger with the 2 bolts.
- Torque:
18 N*m (179 kgf*cm, 13 ft.*lbf)
51202D
48.CONNECT FRONT LOWER SUSPENSION CROSSMEMBER SUB-ASSEMBLY
Install the front lower suspension crossmember sub-assembly with the 6 bolts, 4 washers and 4 nuts.
- Torque:
XX N*m (XXX kgf*cm, XX ft.*lbf)
45450
49.CONNECT STEERING RELAY ROD ASSEMBLY
33110
50.INSTALL MANUAL TRANSMISSION ASSEMBLY
28100
51.INSTALL STARTER ASSEMBLY
27020
52.INSTALL GENERATOR ASSEMBLY
23271F
53.CONNECT FUEL HOSE
Connect the 2 fuel hoses and slide the 2 clamps to secure the hoses.
44774
54.CONNECT UNION TO CONNECTOR TUBE HOSE
Connect the union to connector tube hose.
44310
55.CONNECT VANE PUMP ASSEMBLY
Coat a new O-ring with power steering fluid and install it onto the vane pump assembly.
Connect the vane pump assembly with the 2 bolts.
- Torque:
20 N*m (204 kgf*cm, 15 ft.*lbf)
44379A
56.INSTALL NO. 2 OIL RESERVOIR BRACKET
Install the No. 2 oil reservoir bracket with the 3 bolts.
- Torque:
12 N*m (122 kgf*cm, 9 ft.*lbf)
88320
57.CONNECT COOLER COMPRESSOR ASSEMBLY (w/ Air Conditioning System)
Connect the cooler compressor assembly with the 4 bolts.
- Torque:
47 N*m (475 kgf*cm, 34 ft.*lbf)
Connect the connector.
16577C
58.INSTALL RADIATOR PIPE
Install a new O-ring onto the radiator pipe.
Install the radiator pipe with the 2 bolts.
- Torque:
29 N*m (291 kgf*cm, 21 ft.*lbf)
87245A
59.CONNECT INLET HEATER WATER HOSE A
Connect the inlet heater water hose A and slide the clamp to secure the hose.
16400
60.INSTALL RADIATOR ASSEMBLY
16571
61.CONNECT INLET RADIATOR HOSE
Connect the inlet radiator and slide the clamp to secure the hose.
17030
62.INSTALL AIR HOSE ASSEMBLY
16361
63.INSTALL FAN
17201
64.INSTALL TURBOCHARGER SUB-ASSEMBLY
25608
65.INSTALL EGR COOLER SUB-ASSEMBLY
46700
66.INSTALL EXHAUST RETARDER ASSEMBLY
17410
67.INSTALL FRONT EXHAUST PIPE ASSEMBLY
58701A
68.INSTALL FRONT ENGINE SERVICE COVER PANEL SUB-ASSEMBLY
Install the front engine service cover panel sub-assembly with the 3 bolts.
- Torque:
8.0 N*m (82 kgf*cm, 71 ft.*lbf)
Install the shift wire clamp with the nut.
- Torque:
12 N*m (122 kgf*cm, 9 ft.*lbf)
33506F
69.INSTALL FLOOR SHIFT CONTROL SHIFT LEVER RETAINER SUB-ASSEMBLY
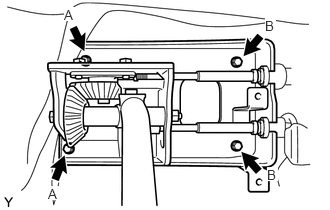
Install the floor shift control shift lever retainer sub-assembly with the 4 bolts.
- Torque:
- for bolt A:
7.5 N*m (76 kgf*cm, 66 ft.*lbf)
- for bolt B:
12 N*m (122 kgf*cm, 9 ft.*lbf)
Connect the select cable, shift cable and washer plate with the nut and 3 new clips.
- Torque:
15 N*m (153 kgf*cm, 11 ft.*lbf)
58123A
70.INSTALL SHIFT AND SELECT LEVER SUPPORT WITH BOOTS
Install the shift and select lever support with boots with the 4 bolts.
- Torque:
8.0 N*m (82 kgf*cm, 71 ft.*lbf)
Install the transmission cover mat.
Install the shift lever knob sub-assembly.
71.CONNECT CABLE TO NEGATIVE BATTERY TERMINAL
72.ADD ENGINE OIL
73.ADD ENGINE COOLANT
74.ADD MANUAL TRANSMISSION OIL
75.INSPECT FOR ENGINE SPEED
76.INSPECT FOR FUEL LEAK
77.INSPECT FOR COOLANT LEAK
78.INSPECT FOR OIL LEAK
79.INSPECT FOR EXHAUST GAS LEAK
80.INSPECT FOR DRIVE BELT
53711C
81.INSTALL FRONT FENDER APRON RH
53712C
82.INSTALL FRONT FENDER APRON LH
51446C
83.INSTALL ENGINE UNDER COVER BRACKET LH
51445D
84.INSTALL ENGINE UNDER COVER BRACKET RH
51441D
85.INSTALL NO. 1 ENGINE UNDER COVER
58420
86.INSTALL NO. 2 ENGINE SERVICE HOLE COVER ASSEMBLY
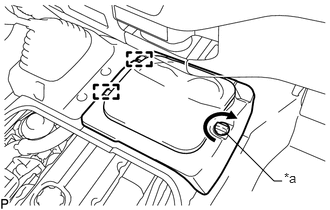
Attach the 2 guides and install the No. 2 engine service hole cover assembly, Turn the knob to attach the hook.
| *a | Knob |
58734B
87.INSTALL REAR ENGINE SERVICE COVER WEATHERSTRIP
Install the rear engine service cover weatherstrip.
58410
88.INSTALL ENGINE SERVICE HOLE COVER
Attach the 2 guides, 2 hooks and install the engine service hole cover.
58521D
89.INSTALL ENGINE SERVICE HOLE COVER MAT
Install the engine service hole cover mat.
90.CHECK INJECTOR COMPENSATION CODE