B58 ENGINE MECHANICAL ENGINE ON-VEHICLE CLEANING
CAUTION / NOTICE / HINT
- CAUTION:
- ·
Hot surfaces.
Risk of burning!
-Perform all work only on components that have cooled down.
- ·
Working on 12 V vehicle electrical system.
Risk of short circuits! Risk of fire!
-Detach battery earth lead from battery.
-For an auxiliary battery: Disconnect battery earth lead of auxiliary battery.
- NOTICE:
- ·
Damage to battery terminal, the safety battery terminal or the intelligent battery sensor (IBS).
Damaged battery terminals can lead to malfunctions or vehicle electrical system faults.
-Pull off battery terminal from battery pole by carefully moving to and fro. Do not pry off using a tool.
PROCEDURE

 1.DISCONNECT CABLE FROM NEGATIVE BATTERY TERMINAL
Click hereGeneral>MAINTENANCE>B58 BATTERY>REMOVAL
2.REMOVE AND INSTALL BONNET HOOD SUPPORT ASSEMBLY
85010
3.REMOVE FRONT WIPER MOTOR AND LINK ASSEMBLY
53383
4.REMOVE HOOD TO COWL TOP SEAL
53681
5.REMOVE UPPER FRONT SUSPENSION CENTER BRACE
55788A
6.REMOVE COWL TOP VENTILATOR LOUVER PROTECTOR
55789B
7.REMOVE NO. 2 COWL TOP VENTILATOR LOUVER PROTECTOR
12601B
8.REMOVE NO. 1 ENGINE COVER SUB-ASSEMBLY
11271A
9.REMOVE NO. 1 ENGINE COVER
10.REMOVE IGNITION COIL
12602D
11.INSTALL NO. 2 ENGINE COVER SUB-ASSEMBLY
23801P
12.REMOVE NO. 1 FUEL PIPE SUB-ASSEMBLY
23802B
13.REMOVE NO. 2 FUEL PIPE SUB-ASSEMBLY
23100X
14.REMOVE FUEL PUMP ASSEMBLY
23250
15.REMOVE FUEL INJECTOR ASSEMBLY (for Front Side)
23250
16.REMOVE FUEL INJECTOR ASSEMBLY (for Rear Side)
15370J
17.REMOVE CAM TIMING OIL CONTROL SOLENOID ASSEMBLY
11201
18.REMOVE CYLINDER HEAD COVER SUB-ASSEMBLY
19.REMOVE NO. 1 INTEGRATION RELAY
20.REMOVE ENGINE ROOM ECM BOX
17700
21.REMOVE AIR CLEANER ASSEMBLY
17880
22.REMOVE AIR CLEANER HOSE ASSEMBLY
17882
23.REMOVE NO. 2 AIR CLEANER HOSE
23285A
24.REMOVE NO. 1 CHECK VALVE
51219
25.REMOVE FRONT SUSPENSION MEMBER LOWER PROTECTOR
26.DRAIN ENGINE COOLANT (for Low Temperature)
17111
27.REMOVE INTAKE MANIFOLD
28.CLEAN INTAKE PORT
- CAUTION:
- ·
Swirling dirt particles caused by compressed air.
Danger of injury!
-Collect dirt particles, e.g. when blowing out, use cloth to do so.
-Wear safety goggles.
- NOTICE:
- ·
Engine damage due to walnut granules in the combustion chamber.
If walnut granules penetrate the combustion chamber while cleaning the intake ports, engine damage may occur.
-Always clean the intake port with valves of the relevant cylinder closed.
-Set the piston of the relevant cylinder to the top dead center.
-If walnut granules have entered the combustion chamber: Do not turn or start the engine by hand.
Disassemble the cylinder head sub-assembly and clean all components.
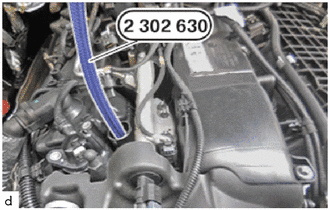
Screw the special tool 2 302 630 into the spark plug thread by hand.
- SST
- 09200-WA660
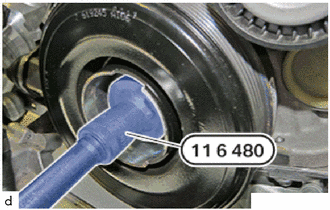
Fit special tool 0 493 380 (11 6 480).
- NOTICE:
- ·
Damage to the engine.
The engine may be damaged if it is manually rotated in the wrong direction.
-Always rotate the engine in the correct direction of rotation by hand: a) Clockwise, facing the vibration damper or b) Counter-clockwise, facing the timing chain. (b) only applies when the rear chain sub-assembly is installed.
- SST
- 09200-WA190
Turn the engine by hand using special tool 0 493 380 (11 6 480).
- SST
- 09200-WA190
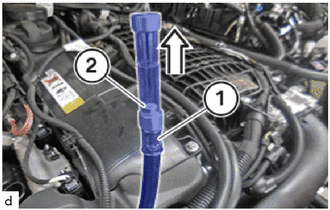
Turn the engine by hand.
When the piston moves up, the journal (2) in the special tool (1) also moves up.
Turn the piston to the top dead center.
In the top dead center, the piston as well as the journal (2) are positioned at the highest point in the special tool (1).
The valves are now closed.
Ensure that the engine is no longer turned further.
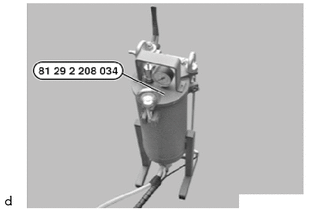
Keep the special tool 2 208 034 , the walnut granules and a standard vacuum cleaner ready.
- SST
- 09200-WA330
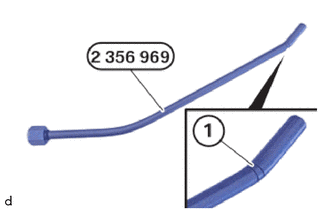
Have the special tool 2 356 969 ready.
- SST
- 09200-WA670
- HINT:
-
The front area of the blasting wand is marked with two notches. These may additionally be highlighted in color.
-
During the blasting process, only pull the blasting wand out of the vacuum adapter until the mark becomes visible.
Observe the mark (1).
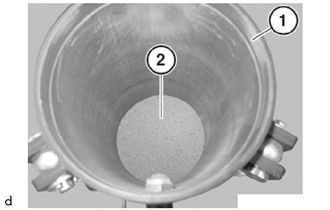
Open blasting device (1).
Fill in walnut granules (2).
- Quantity For Each Blastingprocess:
2 liters (2.11 US qts, 1.76 Imp. qts)
Close blasting device (1).
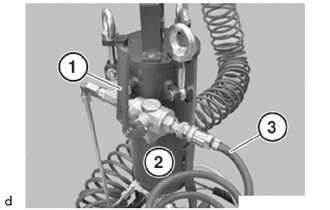
Close the valve (1) on the blasting device (2).
Connect compressed air (3).
- Operating pressure:
600 to 800 kPa (6.12 to 8.16 kgf/cm2, 87 to 116 psi)
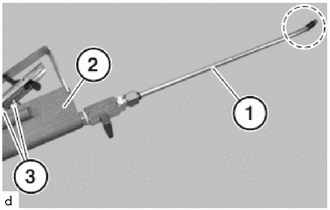
Attach the blasting wand (1) to the blasting device (2).
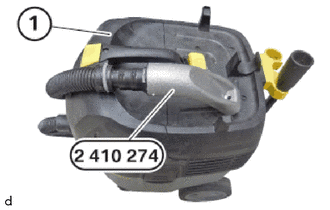
Connect vacuum cleaner (1) with the special tool 2 410 274.
- SST
- 09200-WA340
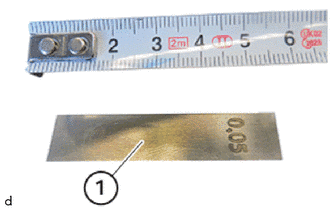
Prepare 3 standard 0.05 mm feeler gauges (1).
Cut 3 feeler gauges (1) to a length of 25 mm.
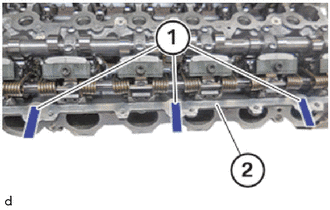
Position the prepared feeler gauges (1) on the blow-by channels of cylinder head cover sub-assembly (2).
Make sure that the blow-by channels are locked on cylinder head sub-assembly (2) using feeler gauges (1).
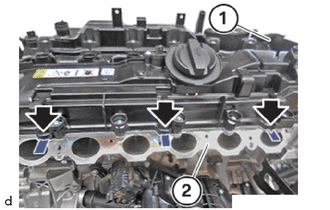
Guide the cylinder head cover sub-assembly (1) in and position it.
Make sure that the feeler gauges (arrows) are positioned correctly between cylinder head cover sub-assembly (1) and the blow-by channels of cylinder head sub-assembly (2).
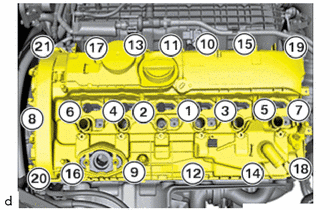
Tighten all E10 bolts in sequence (1) to (21).
- Torque:
- 6.0 N*m (61 kgf*cm, 53 in.*lbf)
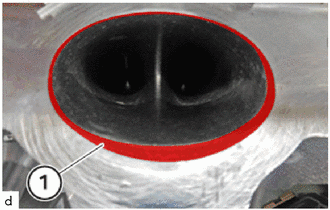
Clean marked areas (1) with a brush.
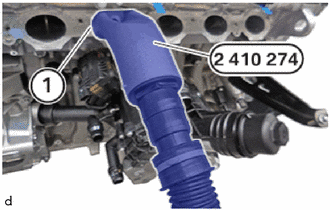
Insert the special tool 2 410 274 in tangential port (1) of the cylinder to be cleaned.
- SST
- 09200-WA340
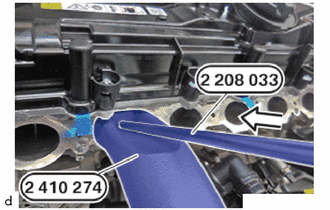
Insert the special tool 2 208 033 in the special tool 2 410 274 in the direction of the arrow.
- SST
- 09200-WA340
09200-WA650
- HINT:
-
Conduct the following operation with the assistance of a second person.
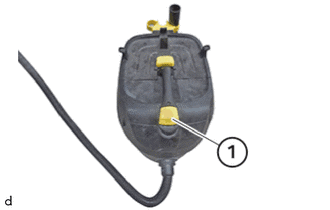
Switch on vacuum cleaner (1).
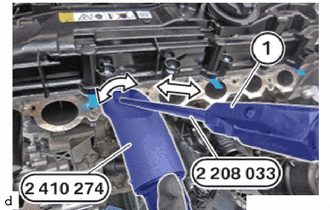
Move and turn the blasting wand in the direction of the arrow.
This removes any dirt in the tangential port.
Open the valve (1).
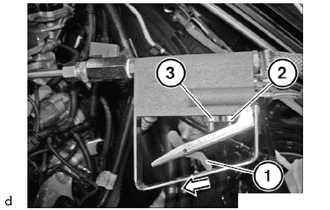
Slide the locking lever (1) forward in the direction of the arrow.
To release the compressed air: Actuate valve (2).
To release the walnut granules and the compressed air: Actuate valves (1) and (2).
Clean the intake port.
- Blast duration with walnutgranules:
Approx. 20 s
- Blast duration with purecompressed air for thecomplete blowing out ofwalnut granules:
Approx. 10 s
Close the valve on the blasting wand.
Check the pressure drop at the pressure measuring device.
Repeat the following steps one after another on all the other cylinders:
Turn the piston of the cylinder to be cleaned to the top dead center.
Clean intake ports.
Loosen all E10 bolts in sequence (21) to (1).
Feed out and remove the cylinder head cover sub-assembly.
Guide out feeler gauges (1) on the blow-by channels of cylinder head sub-assembly (2) and remove them.
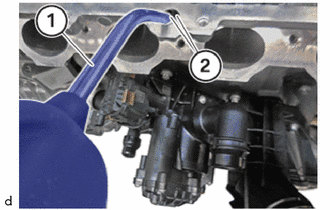
Clean blow-by channels (2) with an air gun (1).
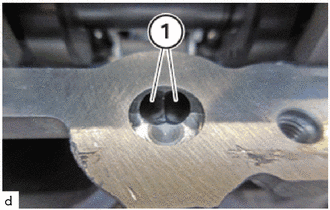
Make sure that there are no walnut granules in the blow-up channels (1).
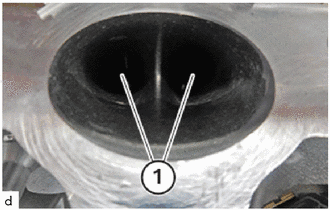
Make sure that there are no walnut granules in the intake ports (1).
17111
29.INSTALL INTAKE MANIFOLD
23285A
30.INSTALL NO. 1 CHECK VALVE
17882
31.INSTALL NO. 2 AIR CLEANER HOSE
17880
32.INSTALL AIR CLEANER HOSE ASSEMBLY
17700
33.INSTALL AIR CLEANER ASSEMBLY
34.INSTALL ENGINE ROOM ECM BOX
35.INSTALL NO. 1 INTEGRATION RELAY
11201
36.INSTALL CYLINDER HEAD COVER SUB-ASSEMBLY
15370J
37.INSTALL CAM TIMING OIL CONTROL SOLENOID ASSEMBLY
23250B
38.REPLACE FUEL INJECTOR SEAL
23250
39.INSTALL FUEL INJECTOR ASSEMBLY (for Rear Side)
23250
40.INSTALL FUEL INJECTOR ASSEMBLY (for Front Side)
23470
41.ADJUST FUEL PUMP LIFTER ASSEMBLY
23100X
42.INSTALL FUEL PUMP ASSEMBLY
23801P
43.INSTALL NO. 1 FUEL PIPE SUB-ASSEMBLY
23802B
44.INSTALL NO. 2 FUEL PIPE SUB-ASSEMBLY
45.INSTALL IGNITION COIL
46.DISCONNECT CABLE FROM NEGATIVE BATTERY TERMINAL
47.ADD ENGINE COOLANT (for Low Pressure)
48.INSPECT ENGINE COOLANT
49. CHECK ENGINE OIL LEVEL
12602D
50.INSTALL NO. 2 ENGINE COVER SUB-ASSEMBLY
12611
51.INSTALL NO. 1 ENGINE COVER
12601B
52.INSTALL NO. 1 ENGINE COVER SUB-ASSEMBLY
55789B
53.INSTALL NO. 2 COWL TOP VENTILATOR LOUVER PROTECTOR
55788A
54.INSTALL COWL TOP VENTILATOR LOUVER PROTECTOR
53681
55.INSTALL UPPER FRONT SUSPENSION CENTER BRACE
53383
56.INSTALL HOOD TO COWL TOP SEAL
85010
57.INSTALL FRONT WIPER MOTOR AND LINK ASSEMBLY
58.REMOVE AND INSTALL BONNET HOOD SUPPORT ASSEMBLY